
Creating an S3 Snapshot Exposure Source
An S3 snapshot exposure source lets you upload exposure data in batch by delivering gzip-compressed CSV files to an MX8-managed S3 bucket. This is the right choice when you collect exposure data in your own systems and want to send it server-side — especially if you need to hash IP addresses before they leave your environment.
Before you begin
You'll need the following information ready:
A source name for this exposure source.
A retention period (in days) for how long records should be kept.
Your Hash Salt (if you're salting hashed IPs).
The column names in your CSV files that correspond to MX8's required fields.
Your IAM Role ARN if you want MX8 to grant your AWS role upload permissions (this maps to the External ARN field).
Step 1 — Open the creation dialog
Navigate to your exposure sources and click Create Exposure Source. Select the S3 snapshot card.

Step 2 — Configure basic settings
Fill in the top-level fields:
Source Name — A descriptive label for this source. This cannot be changed after creation.
Retention Days — How long MX8 retains exposure records for matching. Defaults to 7 days but can be set longer if your campaign requires it.
Enabled — On by default. Toggle off to configure without activating.
Step 3 — Add dimensions
Dimensions work the same way as they do for pixel sources — they're additional attributes attached to each exposure record, used as aggregation buckets. Type a dimension name into the Add Dimension field and press Enter or click + Add Dimension.
Step 4 — Configure field mappings
This is where you tell MX8 how your CSV columns map to the fields it needs. Your column names don't need to match MX8's — you just need to specify which of your columns corresponds to each field.
Required fields:
Hash Salt — The salt value used when hashing IP addresses. If you don't use a salt, leave this empty.
UID Field Mapping — The column name in your CSV that contains the user identifier (e.g.,
user_id).
Optional fields:
Exposed IP Field Mapping — The column containing plaintext IP addresses. Provide this or Hashed IP Field Mapping.
Hashed IP Field Mapping — The column containing hashed IP addresses. Provide this or Exposed IP Field Mapping.
Brand Field Mapping — The column containing the brand name associated with each exposure.
External ARN — Your IAM Role ARN. MX8 uses this to grant your AWS role permission to upload files into your dedicated S3 prefix.
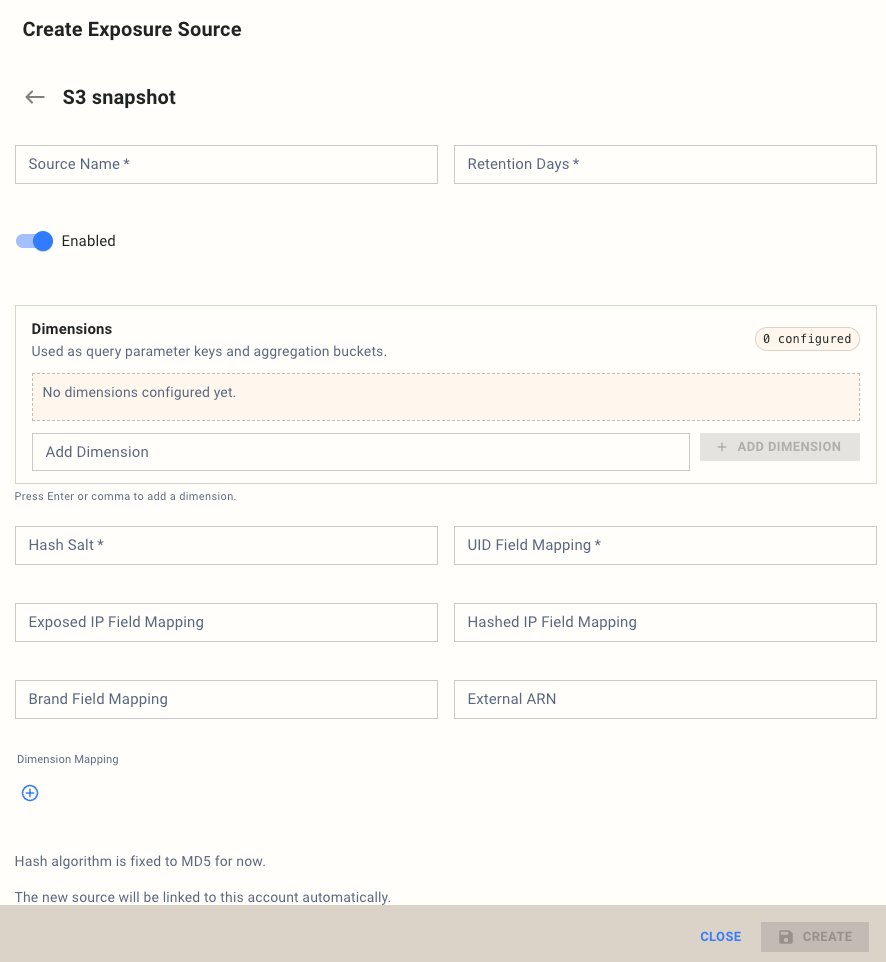
Step 5 — Configure dimension mappings
If you added dimensions in Step 3, scroll to the Dimension Mapping section and click the + button to map each dimension to the corresponding column in your CSV.
Step 6 — Create the source
Click Create to save. The source is now ready to receive files.
Note: The hash algorithm is currently fixed to MD5. Other algorithms are available on request — contact your MX8 account team if you need a different algorithm.
What's next
Server-Side File Delivery & Format Requirements — details on file format, naming, and upload process.
IP Hashing Rules for Exposure Data — input formatting, salt handling, and output format guidance.